
isimSoftware Bulk Active Directory Users
isimSoftware Bulk Active Directory Users


Introduction
Bulk AD Users is a tool that makes it easy to perform bulk updates to Active Directory User account attributes. Previously you might have wrote scripts to perform these types of updates or gone through a very tedious process of performing these updates one at a time via the ADU&C interface. Bulk AD Users makes this process much simpler and also provides an XML log file that allows you to undo any unwanted updates. The application has powerful query capabilities that allow you to target updates to only the required user accounts and number of methods are available for updating user account data depending on your specific requirements.
The Bulk Modify dialog will seem familiar to anyone that has used Active Directory Users & Computers. The interface is modeled on the user dialog, but the updates can apply to many user accounts. The XML Placeholders feature extends the flexibility of the Bulk Modify dialog by allowing you to base updates on existing attributes. You could update the display name format to “surname, firstname” or change the username format to “firstname.surname” for example. The Bulk Modify dialog is great for situations where the update can be based on existing attributes or a single value is required for all users.
The CSV update feature allows you to update user account attributes from a CSV file, making it suitable for updates where a different value is required for each user account. A CSV file could be produced from your HR database and then used to update employee information stored in Active Directory. It’s also possible to export existing account data from Active Directory to CSV file, use a 3rd party application to manipulate the data and then re-import using the CSV Update tool.
Bulk AD Users allows you to edit user account data in Microsoft Excel with the Edit In Excel feature. Microsoft Excel is a very powerful tool for data manipulation allowing you to update user attributes using a combination of manual updates and formulas. It’s very easy to write a formula in Excel to update the user principal name format to ‘firstname.surname@domainname.com’ for example. In this case, you could also choose the Bulk Modify feature to perform the update, but in other situations the formulas will be to complicated to convert into XML Placeholders.
For quick updates to a small number of accounts, the edit in grid feature can be used. The application also supports moving user accounts to a new container, reseting passwords and has quick options for enabling/disabling user accounts. Additional account options (logon hours, password never expires, force password change at next logon etc) can be manipulated through the Bulk Modify dialog.
Advantages of Bulk AD Users
It’s possible to manipulate data in Active Directory by writing your own scripts, using command line tools and other 3rd party applications. I don’t want to discourage people from using command line tools and writing scripts – quite the opposite; I actually encourage the use of scripts and provide information to help people write their own scripts on this website. There are some advantages to using Bulk AD Users over writing your own scripts to consider –
Bulk AD Users is easier to use and doesn’t require knowledge of any scripting language.
Writing scripts can be time consuming and some attributes require special handling making them difficult to update via script.
Updates performed by Bulk AD Users are logged automatically in an XML file. This file enables the application to rollback updates if required – An additional layer of safety not usually provided by command line tools and scripts.
Bulk AD Users is freeware.
In most cases Bulk AD Users is the easiest method of performing bulk updates to user account attributes. You might still choose scripts and command line tools for specific update scenarios where you need additional automation or a great deal of control over the update process.
Is it really FREE? What’s the catch?
Yes! You are free to use the application in any company/organization regardless of size, number of users etc. The application does not expire after a period of time and it’s features are not limited in any way.
The application previously asked for a registration code but this is no longer required. Yeah!
Features
- Searching
- Select users from group (with or without nested members)
- Select users from OU (Allows multi-select)
- Select users from query. A range of pre-defined filters are available and you can write your own custom LDAP filters.
- Ability to extend the list of pre-defined queries to include your own favorite searches.
- Select users from list. Enter user account names manually or from a file.
- Updating
- Simple “Bulk Modify” interface for updates. A dialog similar to the user dialog in ADU&C, but it can work on a large number of user accounts.
- XML Placeholders feature. Can be used with Bulk Modify dialog to base updates on existing user account attributes. e.g. set displayname to “Surname, Firstname”
- Support for multi-valued attributes.
- “Other Tab” provides support for custom AD Attributes and attributes not normally shown in the user interface.
- Photo updates
- Member Of updates.
- Logon hours support
- UserName updates (with optional conflict resolution)
- Enable/Disable/Unlock. (support for other account options also available)
- CSV Update feature.
- Edit In Excel feature.
- Move Users
- Bulk password reset
- Edit In Grid.
- XML Log file produced for each update batch.
- Result dialog to show the success of the update.
- Rollback feature.
- Note: This is not a full list of supported attributes. A large number of attributes are supported by the application and the application can even be used to update attributes that have been added by extensions to the schema.
Miscellaneous
- Connection dialog to connect to other domains.
- Connect to domain from a workgroup computer.
- Export data to Excel, CSV to tab-separated.
- Properties to Load dialog allows you to control which attributes are shown in the grid.
- Password Generation Options – Control the format of generated passwords.
- Extend Bulk AD Users by writing your own scripts.
- Additional customisation available in application config file.
Help
- Planning for Bulk Updates – things to consider before you update your Active Directory database.
- Connecting to Active Directory – how to connect to your Active Directory Database.
- Selecting user accounts – how to select the user accounts you want to modify
- From Query – Bulk AD Users From Query dialog. Information on how to use the From Query dialog and additional information on the pre-defined queries.
- CSV Update – how to update user account data from a CSV input file
- GridView Edit – The grid edit feature of Bulk AD Users is ideal for making quick changes to a small number of user account attributes.
- Edit In Excel – how to edit user account data in Microsoft Excel.
- Bulk Modify – how to use the Bulk Modify dialog to perform bulk updates to user accounts.
- Results/Rollback – describes logging in Bulk AD Users and how it can be used to rollback unwanted updates.
- Photos – Describes how to update photos in Active Directory using the Bulk Modify dialog in Bulk AD Users.
- Extending – Extend the existing functionality of Bulk AD Users with your own custom *.VBS script files.
Bulk AD Users – Planning
There is an element of risk associated with performing bulk updates to your Active Directory database and you should be aware of the risks before starting the bulk update process. These risks should be considered whichever tool you decide to perform the bulk update and Bulk AD Users is no exception. After careful planning and testing the update process is likely to go very smoothly and in the unlikely event of failure, you will be prepared and have a plan in place to fix the problem.
There are a number of things to consider before performing bulk updates to the Active Directory Database:
What impact will the update have on my users?
Certain attributes in Active Directory will have an impact on end users when they are changed. For example, changing the username format from {initial}{surname} to {firstname}.{surname} will prevent your users from logging in, unless you communicate the change before updating the attribute in Active Directory.
What impact will the update have on the performance of my network/servers?
The additional load to the servers and network should be considered, particulary if you have a large network distributed over a slow WAN infrastructure. Additional caution should be applied when updating a very large number of user accounts or if you are updating attributes that are likely to cause a lot of replication traffic (e.g. photos).
What if something goes wrong with the update?
I’d advise performing a backup of the directory before the update and be familiar with restore techniques so that you know what to do in case of failure. Bulk AD Users produces an XML log file that can be used to rollback unwanted updates, an additional safety net that you might not get with other tools. You should also consider testing the update in a lab environment and/or applying the update to a small batch of user accounts to begin with.
- Checklist
- Consider impact on end users
- Consider impact on server/network performance.
- Plan an appropriate time to perform the update. (e.g. out of hours)
- Test the update in a lab environment.
- Have a recovery strategy in case of failure.
- Ensure you are familiar with backup/restore techniques, including authoritative restores.
- Perform a backup of your Active Directory database before the update.
- Test the update on a small batch of user accounts
- Recovery Strategy
- Your recovery strategy should always include having a backup of your Active Directory in place should the need arise for an authoritative restore. Bulk AD Users offers an additional level of protection by producing an XML log file that can be used to rollback unwanted updates. Rolling back the update using the XML log file is quicker and easier than performing an authoritative restore. It’s always advisable to have a backup of your active directory database in addition to the protection provided by the XML log file.
Please be aware that if the update process is interrupted (power failure etc), the XML log file might be incomplete. It could still be possible to undo the changes using the XML log file by editing the file in notepad and adding the closing XML tags. There might be other unanticipated issues that prevent you from been able to use the log file, so always include a backup of your Active Directory database as part of your recovery strategy.
Bulk AD Users – Connecting to Active Directory
Introduction
If you are running Bulk AD Users from a domain workstation or member server, Bulk AD Users will connect to the current domain using the credentials of the logged in user. If you are running from a workgroup computer or standalone server, you will be prompted for the connection details for your Active Directory domain.
Connection Dialog
You will be prompted with the connection dialog below if the application is unable to make a default connection to your Active Directory database. You can also change the connection details at any time by selecting “Connect” from the file menu. You might want to authenticate against the current domain using a different user account or connect to a remote domain for example.
You can connect as your current user account by leaving the “Connect As Self” option selected, or you can uncheck this option and specify a username and password. In the Server/Domain drop down, you can enter any of the following:
The DNS name of your domain
The NETBIOS name of your domain
The NETBIOS name of a domain controlller
The DNS name of a domain controller.
The IP Address of a domain controller.
Advanced Options
Clicking the “Advanced” button allows you to choose a connection root. By default the application will run all searches from the domain subtree, but you might want to specify a lower level in the domain hierarchy. To do this, enter the distinguished name of the container/organizational unit that you want to use as your root connection. e.g. OU=My Users,DC=IsimSoftware,DC=co,DC=uk
You can also choose to connect to your Active Directory database using a different port (The default is 389).
Command Line Options
Connection information can also be passed to the application via command line parameters. The following parameters are available:
Parameter Description Example
-u Username to connect as. (Optional – the default is to connect as the current user account) -u “David Wiseman”
-p Password. (Optional – the default is to connect as the current user account) -p MyP4$$w0rd
-s The server or domain. -s isimsoftware.com
-root The distinguidhed name of the container/organizational unit to use as the root connection. (Optional – the default is to bind to the domain subtree) -root “ou=MyUsers,dc=isimsoftware,dc=co,dc=uk”
-port The port used to connect to your Active Directory database. (Optional, the default is to connect on port 389) -port 389
Bulk AD Users – Selecting User Accounts
Overview
Once you have connected to your Active Directory database, the next step is to select the user accounts you want to modify. There are four simple ways you can import users into the Bulk AD Users interface, which will be discussed in the remainder of this article. Once you have imported users into the Bulk AD Users application, any subsequent imports are cumulative; The previously selected user accounts remain in the grid and any new user acconts will be added in addition to those existing user accounts. A clear grid feature can be used to clear your existing selection.
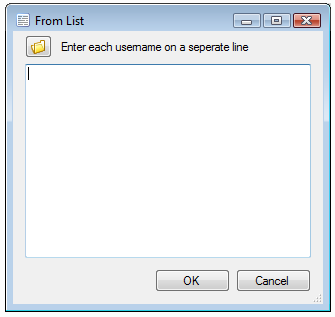
1. From List
The “From List” dialog allows you to enter the usernames you want to modify in a textbox or load them from a text file. Click the “From List” button on the toolbar to launch the dialog box below:
Simply enter the usernames you want to modify one per line of text and click the “OK” button to import those user accounts. You can also click the folder icon to load the usernames from an existing text file.
2. From OU (Organizational Unit)
The “From OU” dialog allows you to select one or more containers/organizational units to search for users accounts. To load users from an organizational unit, click the “From OU” button on the toolbar to load the dialog box below:
Expand the tree as required and select the containers/organizational units you want to include in the search. The default mode is “subtree” which means the selected container and all it’s child containers will be included in the search. The “One Level” mode can be selected if you don’t want to include child containers.
After making your selection, simply click the “OK” button to search for user accounts in the selected OUs.
3. From Query
The “From Query” dialog is similar to the “From OU” dialog, but it allows you to include a search filter to limit the user accounts returned in the query. For example, you might just be interested in enabled user accounts, accounts that have been created in the last few days or users from a specific department. Click the “From Query” button on the toolbar to launch the dialog below.
In part one, you select one or more containers/organizational units to include in the search. The entire domain subtree is selected by default to search for all user accounts in the domain. Click the “Change” button to limit the search to specific organizational units and you will be presented with a dialog box the same as the one shown in the “From OU” section of this article.
In part two, you are able to enter a filter to use for the search by either entering the required filter manually, or selecing from an existing pre-defined filter. Click the “OK” button when you are ready to search for user accounts.
Click here for more information on the From Query dialog
4. From Group
The “Select Group” dialog allows you to select one or more groups and return all the members of those groups. Click the “From Group” button on the toolbar to display the dialog box below:
Simply select the groups you are interested in and click the “OK” button to return the members of those groups. You can select multiple groups by holding down the CTRL key as you make your selection. The default option is to include members from nested groups in addition to direct members of the selected group. You can include just the direct members of the group by unchecking the “Include Nested Members” option.
To make it easy to find the groups you are interested in, a search feature is included. Enter the text you want to search for, select the comparison type and click search to return the groups matching your search criteria. You can also select specific group types from the “Group Types” tab to limit the groups returned by the search.
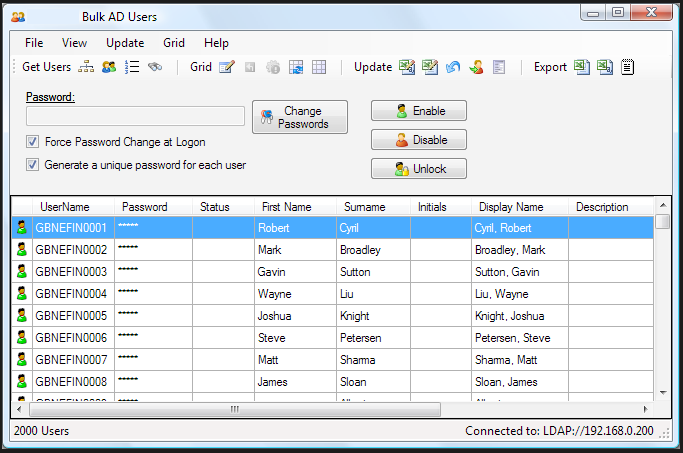
Preview Selected User Accounts
The user accounts you have selected will appear in the grid as shown below. You can remove users from the list by highlighting the row(s) and clicking the “Delete” key on your keyboard.
Bulk AD Users - Grid
You are now ready to perform bulk updates to the selected user accounts.
Bulk AD Users – From Query
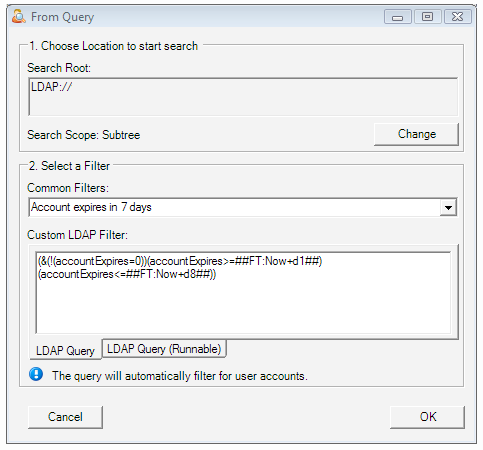
The “From Query” dialog is similar to the “From OU” dialog, but it allows you to include a search filter to limit the user accounts returned in the query. For example, you might just be interested in enabled user accounts, accounts that have been created in the last few days or users from a specific department. Click the “From Query” button on the toolbar to launch the dialog below.
Search Root (Part 1)
In part 1 of the “From Query” dialog, you can select one or more containers/organizational units to search. The default is to search the entire domain (unless you configured a root in the connection). If you would like to specify a different search root(s), click the “Change” button and the dialog box below will appear:
Bulk AD Users - Select OU
Select the containers you would like to search and the appropriate search scope. If you select “Subtree”, all child containers are included in the search. The “One Level” option can be used to limit the search to only users that are direct children of the specified search roots.
Filter (Part 2)
In part two, you are able to enter a filter to use for the search by either entering the required filter manually, or selecting from an existing pre-defined filter. You can type your own filter into the textbox using the LDAP search filter dialect as described in this article. This allows you to write some very powerful searches without any restrictions of a query builder, but it isn’t very user friendly. A number of pre-defined queries are available to select from the drop down to save you from writing your own filters by scratch. These filters can either be run as is or modified to suite your own requirements. Pre-defined filters are discussed in more detail in the next section. Click the “OK” button when you are ready to search for user accounts.
Pre-Defined Queries
A number of pre-defined queries are available to select from the “Common Filters” drop down. These make it easy to run common queries such as recently created user accounts, enabled user accounts and soon to expire user accounts.
Some of these queries have parameters, which are placeholders for the actual value used in the query. For example a query may contain a parameter that is to be replaced by the current date in filetime (large integer) format.
Date Parameters
Date parameters can be specified inside two hash symbols. Date parameters allow you to specify a date in a user friendly format and have it converted to either a larger integer (filetime) or generalized time at runtime.
e.g.
##FT:2007-09-30## converts to 128355804000000000
##GT:2007-09-30## converts to 20070930000000.0+0Z (Time zone dependant)
You can also use the keyword “Now” for the current date.
##FT:Now## = Todays date.
##FT:Now+d1## = Tomorrows date.
##FT:Now-d1## = Yesterdays date.
##FT:Now+m3## = 3 Months from todays date.
##FT:Now-y2## = 2 years ago
Sample LDAP Queries
Account expires in 7 days
User accounts that expire in the next 7 days (but have not already expired).
(&(objectCategory=person)(objectClass=user)(!accountExpires=0)(accountExpires>=##FT:Now+d1##)(accountExpires<=##FT:Now+d8##))
Please note that the LDAP query above specifies two date parameters that will be converted to large integer dates at runtime.
Account has Expiry Date
All user accounts that have a specified account expires date.
(&(objectCategory=person)(objectClass=user)(!accountExpires=9223372036854775807)(!accountExpires=0))
Account Is Expired
This query finds all the user accounts that have expired by searching for accounts that have an expiry date less than or equal to the current date. Please note that if the accountExpires attribute is the current date, the account has already expired. The value shown in Active Directory Users and Computers is actually the previous days date (Expires End Of).
(&(objectCategory=person)(objectClass=user)(!accountExpires=0)(accountExpires<=##FT:Now##))
Account Never Expires
All the user accounts that never expire.
(&(objectCategory=person)(objectClass=user)(|(accountExpires=9223372036854775807)(accountExpires=0)))
Disabled User Accounts
(&(objectCategory=person)(objectClass=user)(userAccountControl:1.2.840.113556.1.4.803:=2))
Enabled User Accounts
(&(objectCategory=person)(objectClass=user)(!userAccountControl:1.2.840.113556.1.4.803:=2))
Locked User Accounts
All the user accounts that have been locked out by the domain lockout policy. Please note that this query does not take into account the lockout duration. An account may have automatically been unlocked depending on your domain policy.
(&(objectCategory=person)(objectClass=user)(lockoutTime>=1))
Must change password at next logon
All the user accounts that are forced to change their password at next logon
(&(objectCategory=person)(objectClass=user)(pwdLastSet=0))
Never Logged on to the domain
All the user accounts that have never logged on to the domain.
(&(objectCategory=person)(objectClass=user)(|(lastlogon=0)(!(lastlogon=*)))
Password Never Expires
All users that are exempt from the “Maximum Password Age” policy. These user accounts are never forced to change their password.
(&(objectCategory=person)(objectClass=user)(userAccountControl:1.2.840.113556.1.4.803:=65536))
Recently Created User Accounts
User accounts that have been created in the last two days. The date can be modified to suite your own needs and will be converted to generalized time format in the runnable LDAP Query.
(&(objectCategory=person)(objectClass=user)(whenCreated>=##GT:Now-d2##))
Users with Exchange Mailbox
All user accounts with an exchange mailbox.
(&(objectCategory=person)(objectClass=user)(msExchHomeServerName=*))
Users with old Passwords
User accounts where the password hasn’t been changed for 3 months.
(&(objectCategory=person)(objectClass=user)(pwdLastSet<=##FT:Now-m3##)(!pwdLastSet=0))
More LDAP Queries?
You can add additional LDAP Queries or modify exising queries by editing the “LDAPFilters.xml” file in the Bulk AD Users program directory. Before you edit the file, you might want to make a backup copy.
Bulk AD Users – CSV Update
Introduction
The CSV Update feature allows you to update user attributes in Active Directory from a comma-separated text file. CSV is a common format used for data exchange between different systems and most data sources will allow you to extract data in this universal format. It should be easy to extract employee information from your HR database to a CSV file that can be used as the input file for the update. It’s also easy to convert Excel spreadsheets to CSV files and to construct your own CSV files using a notepad application.
Generating a valid CSV file
The first step to updating user accounts from a CSV file is to produce a valid CSV file to be used by the update. A CSV file is simply a text file containing rows and columns of data like a spreadsheet and they can be read and written to by spreadsheet applications like Microsoft Excel. As mentioned previously, there is normally a way to extract data from data sources into CSV text files. It’s also possible to produce a text file manually by using an application such as notepad. See here for more information on producing CSV files. As well as ensuring that you have a well formed CSV file, there are also some additional requirements to enable the CSV file to be used as the input source for the CSV update. The CSV file must contain a header row with column names that correspond to the attributes in Active Directory that you want to update. You should be careful to use the correct attribute names as the attribute names don’t always correspond to the ones used in Active Directory Users & Computers. For example, instead of “Last Name” you need to use “sn” and instead of city you would use “l”. You might find the Active Directory Schema Guide on this website useful for identifying the correct attribute names. One of the columns in the CSV file must be used to identify the user account that you want to update in Active Directory. The attributes “sAMAccountName” (User logon name pre-Windows 2000) and “userPrincipalName” (User logon name) are ideal candidates because they are guaranteed to be unique and enable you to unambiguously identify the user account that you want to update. This isn’t a strict requirement so you can use other attributes such as “mail” or “EmployeeID” if no other link to your data source exists. In this case there is a possibility that a row in the CSV file will match to multiple user accounts. If this occurs the update will fail for that row by default, but you can also configure the application to update all user accounts. This might be useful if you know that there are certain people that have more than one user account for different purposes (e.g. system admins might have a normal account and an account with elevated privileges) and you want to update all the accounts linked to that person. You can also exploit this feature if you have a list of departments and information that you want to update for every user in that department (e.g. fax number, manager).
Sample CSV Files
Sample 1
This CSV file was produced from Microsoft’s AdventureWorks sample database and it has been converted into a format that can be used with the CSV update feature:adventureworks_employee.csv The following attribute names are included as column headings in the CSV file:
sAMAccountName This is the username (Pre-Windows 2000) attribute that will be used to link rows in the CSV file to user accounts in Active Directory.
EmployeeID This attribute isn’t visible via the ADU&C interface, but it can be used by other LDAP directory enabled applications. This attribute will also be visible in ADSIEdit.
Title This attribute corresponds to the “Job Title” field on the “Organization” page in ADU&C
streetAddress This attribute corresponds to the “Street” field on the “Address” page in ADU&C.
l This attribute corresponds to the “City” field on the “Address” page in ADU&C.
postalCode This attribute corresponds to the “Zip/Postal Code” field on the “Address” page in ADU&C.
st This attribute corresponds to the “State/Province” field on the “Address” page in ADU&C
department This attribute corresponds to the “Department” field on the “Organization” page in ADU&C.
givenName This attribute corresponds to the “First Name” field on the “General” page in ADU&C.
sn This attribute corresponds to the “Last Name” field on the “General” page in ADU&C.
mail This attribute corresponds to the “E-mail” field on the “General” page in ADU&C.
telephoneNumber This attribute corresponds to the “Telephone number” field on the “General” page in ADU&C.
The sAMAccountName column is particularly important as it provides a link between rows in our CSV file to user accounts in Active Directory.
Note: The CSV update tool isn’t limited to the list of attributes defined above and you can choose a different attribute as your link between rows in the CSV file and user accounts in Active Directory.
Sample 2
This sample CSV file demonstrates how the “Allow multiple users per CSV row” feature can be exploited to update user data for all users in each department.department_update.csv
department This attribute will be used to match rows in the CSV file to every user in those departments, demonstrating an alternative use for the “Allow multiple users per CSV row” feature.
facsimileTelephoneNumber This attribute corresponds to the “Fax” field on the “Telephones” page in ADU&C.
manager This attribute corresponds to the “manager” field on the “Organization” page in ADU&C. Please note that this attribute must be specified in distinguished name format.
Note: Future versions of the application will provide an alternative method similar to the one available in this VBS script.
Instructions
Bulk AD Users - CSV Update dialog
Create your CSV update file as described in the “Generating a valid CSV file” section.
Open Bulk AD Users and select “CSV Update” from the “Update” menu. (You can also click the button on the toolbar)
In section 1, click the folder icon to browse the file system for your CSV file.
In section 2, select the attribute that you want to use to identify the user accounts that you want to update. As mentioned previously, sAMAccountName (Logon name pre-Windows 2000) and userPrincipalName (Logon name) are both good candidates as they are guaranteed to be unique.
In section 3, review the list of attributes and uncheck any attributes that you do not wish to update.
In section 4, you can specify a separator character for multi-valued attributes, allowing you to assign more than 1 value to an attribute. You can also check the option to allow a single row in the CSV file to update more than 1 user account.
Known Issues
Data might be incorrectly converted to a number by the Microsoft.Jet provider, resulting in data loss. e.g. The value 01234 is converted to 1234. This can be prevented by using quotation marks in your CSV file to surround the value. e.g. “01234” instead of 01234. It’s also possible to fix this problem using a schema.ini file.
Note: You might also experience a similar problem where a value gets converted to a date and the data appears in a different format in Active Directory. e.g. 01/01/2010 would get converted to a date and appear as “01/01/2010 00:00:00”. This is part of the same issue and the workaround above will also apply.
CSV files with delimiters other then the comma “,” character are not supported. (Using a semi-colon character “;” as a delimiter is also a popular file format)
These issues will be resolved in future versions of the application.
Bulk AD Users – GridView Edit
Introduction
The GridView edit feature of Bulk AD Users is ideal for making a few quick changes to user account attributes. If you are planning to update a large number of user accounts, the CSV Update, Edit In Excel or Bulk Modify features are probably more appropriate.
Instructions
Add the user accounts you want to update to the grid
The grid is read only by default. To allow edits, click the “Allow Modifications” toolbar button or select “Allow Modifications” from the “Grid” menu
Bulk AD Users - Edit Grid
You should now be able to edit user account data in the grid.
Once you have finished updating user accounts, click the “Apply Modifications” toolbar button or select “Apply Modifications” from the “Grid” menu.
The Bulk Modify Results dialog will display allowing you to review the updates you’ve made and also to roll back the update if required.
Note: Any updates you make in the grid are not applied to the user accounts until you click the “Apply Modifications” button. If you want to discard your changes, you can simply click the “Cancel Modifications” option from the “Grid” menu or click the appropriate toolbar button.
- Bulk AD Users – Bulk Modify
- BulkADUsers - Bulk Modify
- Bulk Modify dialog
Overview
The Bulk Modify dialog is a simple way to update user account attributes for a large number of user accounts. The Bulk Modify method is appropriate where you want to update all users to have the same attribute value, or the attribute value can be based on other existing attributes. For example, you might want to change the logon hours for selected user accounts to prevent them from logging in out of hours. You might want to force all users to change their password at next logon, or add all users in the “Accounting” ou to the “Accounting” group. The ability to base updates on existing attributes also allows you to change the display name format to “surname, firstname” or to update your username format to “firstname.surname”. A large number of other update scenarios are also supported. For updates that require a different value for each user account and the update can’t be based on existing data, you might want to consider the CSV Update or the Edit In Excel feature. (E.g. Data from your HR database like firstname, surname etc)
Getting Started
After selecting the user accounts you want to modify, launch the Bulk Modify dialog by selecting the Bulk Modify button on the toolbar.
The Bulk Modify dialog (pictured at the top of the page) will be displayed. The dialog has been designed to look similar to the user dialog in Active Directory Users and Computers – this will make it easier for you to find the attributes you want to modify as the user interface is already familiar to you.
You will find that the textboxes that you normally use to enter information are disabled in the “Bulk Modify” user interface. If you want to modify an attribute you will need to select the checkbox located to the left of the textbox. Once the checkbox has been checked you will be able to enter data into the textbox – this also provides a signal to the application that the attribute selected is to be modified. Most checkboxes also have an intermediate state (The checkbox is checked but also greyed out) that is used to clear the attribute. If you enter a zero length string into the textbox this will not clear the attribute and normally results in a failed attribute modification.
Once you have specified the required updates, click the “Update” button to apply your changes. After the application has finished applying updates to Active Directory, the Bulk Modify Results dialog is displayed to show the success/failure of the update. You can view the details of the update and rollback the update if required.
XML Placeholders
The ability to modify attributes in bulk would be of limited use without some additional intelligence. For example, you might want to specify that the Display Name attribute is set to “Surname, Firstname” or specify the user profile path to be “\\server\share\username”. This is where XML Placeholders come in. XML Placeholders allow you to do all of the above plus text find and replacement and other forms of string manipulation. Some common options are automatically entered for you by various hyperlinks in the application. In the Bulk Modify dialog pictured at the top of the page, the “Surname, Firstname” hyperlink next to the “Display Name” attribute was clicked to insert the required XML placeholders into the “Display Name” textbox.
If you want to set a single value for all user accounts, the XML placeholders feature can be ignored – just enter the value required in the textbox. To base an update on existing attribute you will include placeholders that will be substituted for an existing attribute value when the update is performed. The placeholders are specially formatted in XML tags to allow the application to recognise that the text is to be replaced with an existing attribute value. The name of the attribute is inserted between “” and “”, like the value specified in the Bulk Modify dialog shown at the top of the page:
<attr>sn</attr>, <attr>givenName</attr>
The part “sn” will be replaced by the “sn” (surname) attribute, the “, ” part remains unchanged and the”givenName” part is replaced by the “givenName” (first name) attribute. The new value would look something like “Wiseman, David” or “Doe, John”.
XML Placeholder Examples
The easiest way to learn what you can do with XML placeholders is probably through a series of examples provided below:
FirstName.Surname
<attr>givenName</attr>.<attr>sn</attr>
Surname, FirstName:
<attr>sn</attr>, <attr>givenName</attr>
Convert company name to UPPERCASE:
<attr transform=”UPPER”>company</attr>
Convert display name to lowercase:
<attr transform=”LOWER”>displayName</attr>
Convert display name to Proper Case:
<attr transform=”PROPERCASE”>displayName</attr>
Replace “IsimSoftware” with “IsimSoftware Corporation”:
<attr findtext=”IsimSoftware” replacewith=”IsimSoftware Corporation”>company</attr>
Remove whitespace from description attribute:
From start and end:
<attr transform=”TRIM”>description</attr>
From end only:
<attr transform=”RTRIM”>description</attr>
From start only:
<attr transform=”LTRIM”>description</attr>
First Letter of FirstName + Surname:
<attr transform=”LEFT(1)”>givenName</attr><attr>sn</attr>
Last 4 characters of Telephone Number (Extension?):
<attr transform=”RIGHT(4)”>telephoneNumber</attr>
3rd and 4th character of EmployeeID
SUBSTIRNG(start,length)
<attr transform=”SUBSTRING(3,2)”>employeeID</attr>
Convert first letter of First Name to Uppercase
<attr transform=”LEFT(1)” transform2=”UPPER”>givenName</attr><attr transform=”SUBSTRING(1,*)”>givenName</attr>
NULL attribute values
XML Placeholders will generate a validation error by default if the attribute specified does not have a value. The application will not attempt to modify the value. You can change this behaviour by specifying a “nullvalue” attribute in the XML Placeholder. If the attribute does not have a value, the text specified for “nullvalue” will be used.
The following example will replace any null values for the surname (sn) attribute with a blank string.
<attr nullvalue=””>sn</attr>, <attr>givenName</attr>
If the surname didn’t have a value but the first name was set to “David”, the placeholder above would produce “, David”. You might just want to use the value of the first name attribute where the surname attribute is null. You can do this by specifying the “, ” as a postfixtext attribute in the XML placeholder. e.g.
<attr nullvalue=”” postfixtext=”, “>sn</attr><attr nullvalue=””>givenName</attr>
The prefixtext and postfixtext attributes are ignored when the attribute has a null value.
Bulk AD Users – Edit In Excel
Introduction
Bulk AD Users allows you to edit user account data in Microsoft Excel, providing you with full access to all the powerful data manipulation features of Microsoft’s spreadsheet application. The Bulk Modify feature of Bulk AD Users can be used to perform quite a variety of updates, but Excel provides access to a much large number of functions that you can use to perform more complex updates. There is also a good chance that you are already familiar with Microsoft Excel, so the learning curve is greatly reduced as you don’t need to learn a new expression language. The rest of this page will show you how easy it is to use the edit in excel feature to apply a bulk update to a large number of user accounts. Instructions
Open Bulk AD Users
Add any attributes you want to modify to the search grid using the “Properties To Load” feature.
Select the user accounts you want to update
Select “Edit In Excel” from the update menu or click the toolbar icon.
Wait for the account data to be refreshed or click cancel if you are sure the cached data in the grid is already up-to-date.
Note: This behaviour can be modified by changing the “RefreshDataBeforeExcelEdit” option in the “BulkADUsers.exe.config” file.
You should now see your user account data in Microsoft Excel. Edit the spreadsheet as required, making use of any of Excel’s formulas if required. If the spreadsheet contains user accounts that you don’t want to modify, feel free to remove those rows – The user accounts won’t be deleted.
Note: The ADsPath column is used to identify the user accounts in Active Directory so don’t modify the data in this column or remove the column from the spreadsheet. Also, the column names in the spreadsheet are used to identify the attributes to update, so don’t make any changes to the column names unless it is your intention to modify a different attribute.
Edit In Excel
After you have finished making changes to the spreadsheet, simply close Microsoft Excel and save changes to the spreadsheet file when prompted.
You will now be prompted to select the attributes that you want to update.
Edit in Excel - Attributes to update
Check any attributes that you want to update and click “OK”
Bulk AD Users will now perform the update and display the “Bulk Modify Results” window when it’s finished. The results dialog allows you to check for any failed updates and enables you to rollback the update if required. An XML log file is produced for the update and you can open this file at any time in the results dialog to review the update and perform a rollback.
Excel Compatibility
The edit in Excel feature has been tested with the following versions of Microsoft Excel:
- Excel 2003
- Excel 2007
The feature might also work with other versions of Excel, but it hasn’t been QA tested.
Known Issues
Data might be incorrectly converted to a number by Excel resulting in data loss. e.g. Excel would interpret the value “01234” as a number by default and the zero is lost in this process leaving the value as “1234”. You can change the number format to “Text” to prevent Excel from converting text data to numeric.
If you are running a non-English language version of Excel, you might get a error if the default name of the sheet tab is not “Sheet1”. You can rename the sheet to “Sheet1” as a workaround for this issue.
You might get a “”Old format or invalid type library” error message if you run an English version of Excel, but the language settings for the computer are for a non-English language.
Bulk AD Users – Results/Rollback
Bulk AD Users displays a result dialog box after performing a bulk update using Bulk Modify, CSV Update or Edit In Excel. The results dialog (pictured below) allows you to view the success of the update and it also allows you to rollback the update, returning user attributes back to their original values.
Bulk AD Users - Results Summary
The summary screen above allows you to see the success of your update. In this case the update was performed on 1495 users with 1428 successful updates, 1 failed updates and 66 users where no change was made because the existing value already matches the updated value. In this case, the total number of updates is equal to the number of users that have been updated indicating that a single attribute was updated.
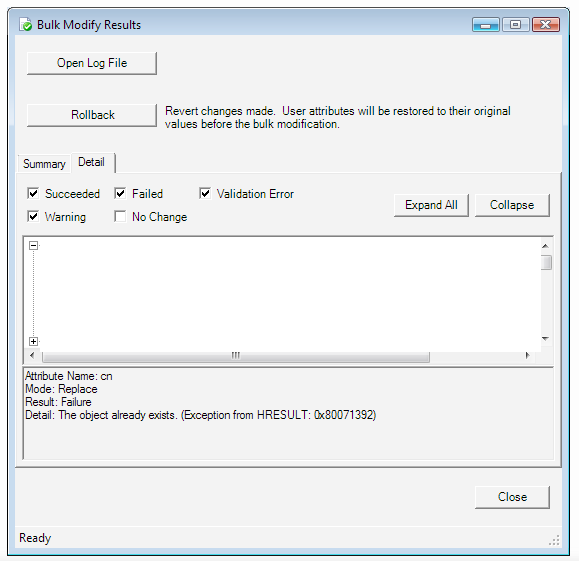
Clicking the “Detail” tab allows us to view the failed updates in detail. If you navigate down to the attribute level as shown in the dialog below, you can see the detail of the failed update. In this case the error is “The object already exists” and this is caused because we were updating the common-name (cn) format to “surname, firstname” and this attribute must be unique within the parent container (OU). Note: When updating the common-name attribute, there is also an option for “conflict resolution”. If conflict resolution is enabled, the common name will be appended with a unique number allowing the update to succeed and the success status of the update will be “Warning” when conflict resolution is used.
Bulk AD Users - Results Detail
Note:
The filters apply to the overall result for the user. If multiple modifications are made the user result is the most negative result. For example if two modification were made where one succeeded and one failed, the user overall result would be failure.
Logging and Rollback
The result dialog provides an easy way of viewing the results of your bulk update, but the results are actually stored in an XML Log file. By default the XML log files are stored in a “IsimSoftwareBulkModifyLogs” folder inside your “My Documents” folder. It’s possible to view the log files in any text/XML Editor: NotePad, Internet Explorer, XML Spy etc. You can also load the results back into the results dialog after it has been closed. From the “Update” menu in the main Bulk AD Users dialog, select the “Rollback Modifications” menu item. Click the “Open Log File” and choose the log file that you want to open.
If you view the log file you will notice that extensive information is recorded about the update, including the old attribute values. Sufficient information is recorded to allow the application to rollback the update, returning the properties back to their original values. This provides an additional level of protection when you use Bulk AD Users to perform your updates as you can undo the update at the click of a button.
Note:
The rollback option provides an additional level of security when making bulk modifications to Active Directory but it is NOT guaranteed to be foolproof.
An example of a situation that might cause a problem is a power-cut that occurs while the application is recording modifications to the log file. In this case the XML log file will be incomplete and the application might have problems reading the file. In this case, you could try to edit the log file manually, adding the closing XML tags where required to ensure a well formed XML file. Other problems could also occur that haven’t been anticipated so it’s also advisable to have a recent backup of your directory before making any bulk modifications.
To rollback a batch of updates, simply click the “Rollback” button in the results dialog. A progress bar is shown to indicate the rollback progress. Once the rollback is complete, a second results dialog is displayed for the rollback operation and the changes are also logged in an XML log file in the same way as the original update.
Bulk AD Users – Update Photos
Planning
You should consider the pros and cons of storing photos in Active Directory as well as the implecations of bulk loading photos in Active Directory.
Lets say that you have 20,000 user accounts in your Active Directory and you are planning to load a 100Kb (on average) photo of each user into Active Directory. You would expect to need an additional 1953Mb of storage ([20000*100]/1024) on each of your domain controllers. You also need to consider the affect on replication – especially if you have some sites with slow or saturated links.
You also need to consider the affect of applications downloading photos from Active Directory – these might add some additional load on your domain controllers so you will need to size them accordingly.
The impact of storing photos in Active Directory is likely to be quite minimal for an organisation with a few hundred user accounts, small image sizes and a handfull or of domain controllers in a single site. The impact on a larger organization with thousands of user accounts accross multiple sites with slow links and larger image sizes could be quite severe.
You will need to decide which attribute to use to store your photos or you might be planning to extend the schema with your own attributes. A number of attributes exist that are designed to allow you to store user photos in Active Directory. Assuming you are using “Windows 2003 Server” you can use any of the following attributes:
Attribute Name Multi-Valued? Max File Size Description
photo Yes – An object encoded in G3 fax as explained in recommendation T.4, with an ASN.1 wrapper to make it compatible with an X.400 BodyPart as defined in X.420.
thumbnaillogo No 32Kb Logo
thumbnailphoto No 100Kb Picture
jpegphoto Yes – Used to store one or more images of a person using the JPEG File Interchange Format [JFIF].
Tips
Plan carefully – make sure you understand the impact of storing photos in Active Directory.
Keep file sizes as small as possible.
Run bulk updates at “quiet” times.
You might want to run tests in a QA environment before making changes to your live system. Also ensure that you have recent backups of your Active Directory.
Updating
You can use Bulk Modify to bulk load user photos into Active Directory. Click the “Other” tab and select the attribute you want to use to store your employee photos. Select the “Replace” option if appropriate.
Bulk AD Users - Modify Photos
The Octet string editor should be displayed. You will need to change the “Edit value as” option to “Path to file”. This will allow you to load a different photo for each user.
If you click the “Sample user photo path” link, the following filename format will be used “\\server1\photoshare\username.jpg”. You can edit the path as required using either a UNC or a local path. The XML PlaceHolder “sAMAccountName” is replaced with the username (Pre Windows 2000 Logon name).
XML Log File
Photos are handled slightly differently in the XML log file. If old and new files were encoded inside the XML log file, the size of the log file would grow quite large. Any file over 1Kb is stored in an external file and a pointer is inserted into the XML log file.
The photos will be stored in a file called “_data”. The file does not have a file extension but it is possible to open the file by using a zip application.
Bulk AD Users – Extending
Introduction
Bulk AD Users includes an array of features that make it one of the most useful tools for performing bulk updates to Active Directory user accounts. This functionality can also be extended through the use of VBS scripts, allowing you to add highly customized behaviour to the application. As an example, you might want to add an option that will create home folders for users and assign permissions to those folders.
How it Works
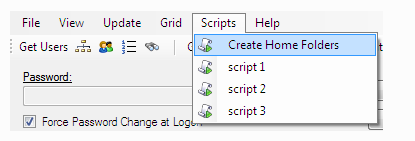
The first step is to create a scripts subfolder in the Bulk AD Users application directory. Any script files that you create in this folder with a *.VBS file extension will automatically be available to the application. Any scripts added will appear in the scripts menu in the application as shown below:
Bulk AD Users - Scripts Menu
When you click to run a script, the script is run once for each user account in the grid. The application passes a couple of parameters to the script to enable your script to identify the user account that it needs to run for. To reference the parameters in your script, simply use the following code in your VBS script file: Dim strADsPath, strUserNamestrADsPath = wscript.arguments.named.item(“ADsPath”)
strUserName= wscript.arguments.named.item(“sAMAccountName”) The ADsPath parameter gives you access to the full path to the user object in Active Directory, which you can use to bind to the user object using the code below: SET objUser = GETOBJECT(strADsPath) The user object can then be used to read any other attribute of the user account and it can also be used to perform updates. If you only need access to the username you can get this from the “sAMAccountName” parameter without binding to the user account.
Example
This example will demonstrate how to create home folders for user accounts and modify NTFS file permissions to grant the user full access to the new folder. The example uses a command line tool called CACLS to modify the NTFS permissions. The default parameters in the script will preserve any existing permissions and also grant the user full control to the folder. If you would like to change this behaviour, please consult the CACLS documentation here.
OPTION EXPLICIT
DIM strADsPath,strUserName, strHomeFolder, strCommand
DIM objUser,objFSO,objShell
DIM intErrorStatus
' Get arguments passed to this script by Bulk AD User application
strADsPath = wscript.arguments.named.item("ADsPath")
strUserName= wscript.arguments.named.item("sAMAccountName")
SET objFSO = CREATEOBJECT("Scripting.FileSystemObject")
SET objShell = CREATEOBJECT("Wscript.Shell")
' Bind to the user object to get home folder
SET objUser = GETOBJECT(strADsPath)
strhomeFolder = objUser.GET("homeDirectory")
SET objUser = NOTHING
' Create home folder (Note: script will fail at this point if holde folder already exists)
objFSO.CreateFolder strHomeFolder
' Construct cacls command to modify permissions (grant user full control)
strCommand = "%COMSPEC% /c Echo Y| cacls """ _
& strHomeFolder & """ /t /e /c /g " _
& strUserName & ":F "
' Run cacls command
intErrorStatus = objShell.Run(strCommand, 2, TRUE)
' Check error status
IF intErrorStatus <> 0 THEN
wscript.echo "Error assigning permissions for user " _
& strUserName & " to home folder " & strHomeFolder
ELSE
wscript.echo "OK"
END IF
1
2
3
4
5
6
7
8
9
10
11
12
13
14
15
16
17
18
19
20
21
22
23
24
25
26
27
28
OPTION EXPLICIT
DIM strADsPath,strUserName, strHomeFolder, strCommand
DIM objUser,objFSO,objShell
DIM intErrorStatus
' Get arguments passed to this script by Bulk AD User application
strADsPath = wscript.arguments.named.item("ADsPath")
strUserName= wscript.arguments.named.item("sAMAccountName")
SET objFSO = CREATEOBJECT("Scripting.FileSystemObject")
SET objShell = CREATEOBJECT("Wscript.Shell")
' Bind to the user object to get home folder
SET objUser = GETOBJECT(strADsPath)
strhomeFolder = objUser.GET("homeDirectory")
SET objUser = NOTHING
' Create home folder (Note: script will fail at this point if holde folder already exists)
objFSO.CreateFolder strHomeFolder
' Construct cacls command to modify permissions (grant user full control)
strCommand = "%COMSPEC% /c Echo Y| cacls """ _
& strHomeFolder & """ /t /e /c /g " _
& strUserName & ":F "
' Run cacls command
intErrorStatus = objShell.Run(strCommand, 2, TRUE)
' Check error status
IF intErrorStatus <> 0 THEN
wscript.echo "Error assigning permissions for user " _
& strUserName & " to home folder " & strHomeFolder
ELSE
wscript.echo "OK"
END IF
Save the script above as “Create Home Folders.vbs” inside the “scripts” folder in the Bulk AD Users application directory.
Run the Bulk AD Users application.
Select the user accounts that you want to create home folders for.
Ensure that the homeDirectory attribute is set for these user accounts – You might want to use one of the update features of the application (e.g. Bulk Modify) to specify a value for this attribute.
Check that you are running as an account with sufficient permissions to create home folders and change ACL permissions. Both NTFS and share permissions will be required.
Select the “Create Home Folders” option from the scripts menu.
Known Issues
The Bulk Modify Results dialog will appear if you have performed a previous update using the application. Scripts run from Bulk AD Users do not produce a log file and the results that are shown are for the previous update. The results dialog should be ignored if it is shown.
DataImage12.png
DataImage12.png
DataImage31.png
DataImage31.png
DataImage31.png
DataImage31.png
DataImage31.png
DataImage31.png
DataImage31.png
DataImage31.png
DataImage31.png
DataImage31.png
DataImage4.png
DataImage4.png
DataImage4.png
DataImage4.png
DataImage4.png
DataImage4.png
DataImage48.png
DataImage48.png
DataImage60.png
DataImage60.png
DataImage67.png
DataImage67.png
DataImage67.png
DataImage67.png
DataImage67.png
DataImage67.png
DataImage67.png
DataImage67.png
DataImage67.png
DataImage67.png
DataImage67.png
DataImage67.png
IsimsoftwareBulkActiveDirectoryUsers.rar
IsimsoftwareBulkActiveDirectoryUsers.rar
IsimsoftwareBulkActiveDirectoryUsers.zip
IsimsoftwareBulkActiveDirectoryUsers.zip
| Files | ||
|---|---|---|
|
DataImage12.png 87,5 KB |
||
|
DataImage31.png 44,2 KB |
||
|
DataImage31.png 10,4 KB |
||
|
DataImage31.png 18,7 KB |
||
|
DataImage31.png 32,5 KB |
||
|
DataImage31.png 13,4 KB |
||
|
DataImage4.png 15,6 KB |
||
|
DataImage4.png 50 KB |
||
|
DataImage4.png 27,7 KB |
||
|
DataImage48.png 87,1 KB |
||
|
DataImage60.png 18,6 KB |
||
|
DataImage67.png 17 KB |
||
|
DataImage67.png 6,9 KB |
||
|
DataImage67.png 21,5 KB |
||
|
DataImage67.png 130,9 KB |
||
|
DataImage67.png 21 KB |
||
|
DataImage67.png 17 KB |
||
|
IsimsoftwareBulkActiveDirectoryUsers.rar 646,3 KB |
||
|
IsimsoftwareBulkActiveDirectoryUsers.zip 714,9 KB |
 Get help for this page
 Isimsoftware Support System