
isimSoftware Password Control
isimSoftware Password Control


Overview
Password Control is a tool designed to allow helpdesk staff and other IT support personnel to reset user passwords. It has a simple and intuitive interface that many users find more productive than a custom MMC console. Password Control is designed to work with Active Directory based domains. It also features other functions such as the ability to enable and disable user accounts (you can edit a config file to remove these features if required).
The “G” button shown in the screenshot above (next to the password box) is used to generate random passwords. By default the generated password will contain a random combination of upper case and lower case characters and digits. Symbols can also be included and you can alter the length of the password generated above that of your minimum password length setting. You can also choose to use a “pass phrase” or a custom password mask. A pass phrase is simply a combination of two words separated by a space. A mask gives you the ability to set the exact format of the password. e.g. 5 lowercase characters followed by 2 digits, A random word followed by 3 digits, a specific password etc.
Please read this document to help you get started.
Note: The application will prompt for registration. This is no longer required, just download the license file and copy it to the application folder.
Features
- Enable/Disable Accounts.
- Password Reset with automatic account unlock.
- Password Generation. A random password can be generated of a specified length with the option of uppercase, lowercase, digits and symbols. A pass phrase can also be used or you can specify a custom mask for generating passwords.
- Unlock user accounts.
- Change various account options. e.g. “Password Never Expires”, “User must change password at next logon” etc
- Connect As Feature – Quick and easy method of running Password Control as a user with enhanced privileges.
- Multi-Domain support. The domain can easily be changed using the menu and the domain list is built automatically from the trusted domains in your enterprise. You can also add additional domains by hand or configure Password Control so that is connects to a specific domain controller. By default, Password Control will connect to any available domain controller in the current domain, but this behavior can easily be changed.
- Searching capabilities – Easy to search for user accounts when the account name is not known. A simple search feature is included to search for users based on a combination of firstname and surname. An advanced search feature is also included that reuses the existing Microsoft object search dialog with which you are probably already familiar.
- Ability to customize which properties are displayed for user accounts. Display virtually any attribute.
- Domain Policy – A quick method to determine which password policy settings are defined for your domain.
- Extensible design – additional features can be added with scripts.
- Picture Gallery feature for users storing photos in Active Directory.
- Bulk Password Control for changing Passwords for many user accounts. Note: this feature will be part of a separate application called Bulk AD Users in the next release.
- Bulk Modify for changing attributes of many user accounts. Note: this feature is replaced by a separate application called Bulk AD Users now.
Password Control – Basics
Finding a User
The first step to reset a user’s password is to find the user account. Password Control provides 3 different ways to do this:
Method 1
Password Control - Enter Username
This is the easiest method if you know the username: Simply type the username in the username box. (You can enter either the pre-Windows 2000 logon name or the User Principal Name.). When you click the tab key to move to the “Password” textbox the username will display in underlined font if the user has been found.
Method 2
Password Control - Search for User
You can also choose to use the integrated search feature to search for a user account. By default this will search the Surname (sn), Email (mail), DisplayName, Common-Name (cn), UserPrincipalName and UserName (sAMAccountName) properties of a user account.
For example, if I know the user’s surname is “Wiseman” I can enter this into the username textbox as shown in the image above. To perform the search click the “Check UserName” button or press the “Enter” key on the keyboard. In this case 2 matches were found so an additional dialog box is shown to allow you to pick the correct user account:
Click here for information on how you can customize the integrated search feature.
Method 3
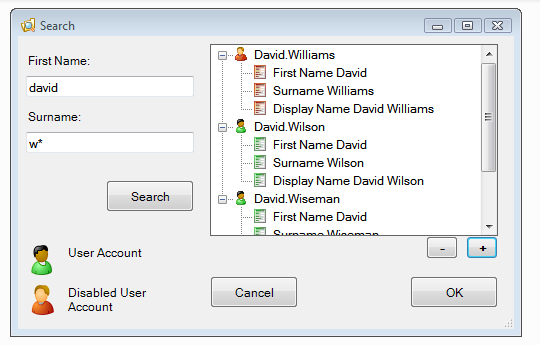
If you don’t know the username, you can search for a user account using the basic search feature. Select “Search” from the File menu or press F3. The basic search feature allows you to search for a user account using a combination of first name and surname. By default an exact match is required – use the wildcard character “*” to specify a “begins with” or an “ends with” search. Click the search button after you have entered a first name/surname as shown below:
Password Control - Search for user (First Name/Surname search)
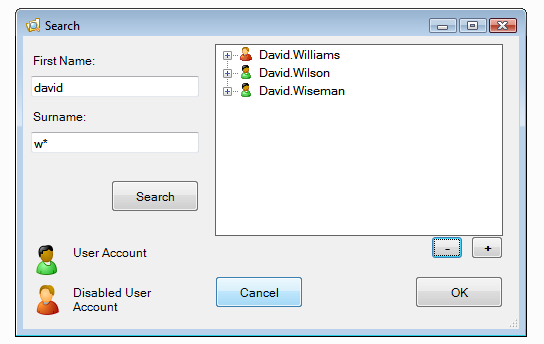
You can click the +/- buttons to expand/collapse the treeview display as shown:
Password Control - Search for user (minimized)
Disabled user accounts are shown with a red user icon. Once you have identified the user account, click to select the user then click the OK button to return to the main password control form.
Additional Checks
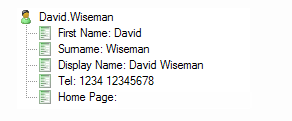
Once you have selected a user account using on of the three methods above, the users properties are shown in the box to the right of the username box – this allows you to verify that the username is correct and that you have selected the correct user account:
Changing the Password
Once you have found the correct user account, enter the password in the password box. Please ensure that the password meets the minimum password length and complexity requirements. Also, please be careful that you enter the password correctly – There is no “Confirm Password” box. You can also click the “G” button to generate a password automatically.
Select the “Force Password Change at Logon” option as appropriate. It is recommended that users are forced to change the password when they logon.
The “Change Password” button should be enabled when a valid username and password have been selected. Click this button to change the password.
Password Control - Change an Active Directory User Password
Disable/Enable a User Account
Once you have found a user, simply click the “Disable Account” button to disable a user account. An enabled user account is displayed in green, if the user account is shown in red; the user account is already disabled.
Password Control - Disable Active Directory User Account
Click the “Enable Account” button to enable the user account.
Unlock a user Account
The user account is automatically unlocked when you reset the password. Uncheck the “Account is Locked” checkbox if you prefer not to change the password.
Change Account Options
Password Control - Set user account options
The account menu can be used to change various account options. Simply click an account option to toggle it on or off. The menu item will have a check mark next to it when the option is enabled.
This feature is new in version 2.3 and is useful if use the “Force Password Change at next logon” when changing a password by mistake and don’t want to force the user to change their password. You can click the “User must change password at next logon” option in the account menu to enable/disable this feature.
Image Gallery
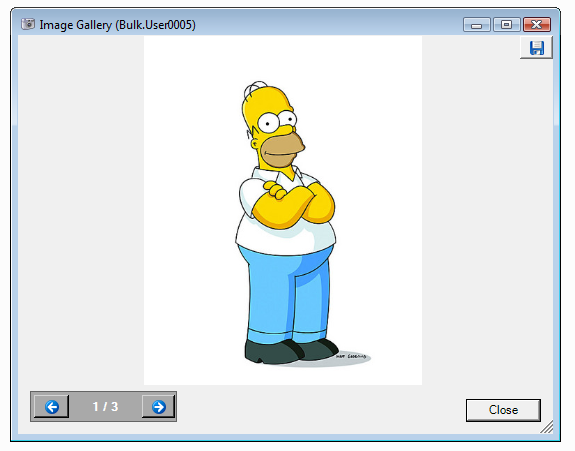
Password Control is able to display a image gallery for a particular user if you are storing user images in Active Directory. User photos could be used for identification purposes in some helpdesk scenarios.
Password Control - Image Gallery Button
The picture in the right hand corner indicates that one or more images are available for the selected user account. Click the image to display the photo gallery.
Password Control – System Requirements
Any the following OS: Windows 2003, Windows 2000, Windows XP, Windows Vista
Active Directory Domain
.NET Framework 2.0
MDAC 2.6 or later
Optional: TsUserEx.dll is required to modify Terminal Server attributes (Bulk Modify component). This can be obtained by installing the Windows 2003 Administration Tools Pack.
Optional: Microsoft Excel. Microsoft Excel is required for the “Edit in Excel” feature. Excel 2003 and Excel 2007 versions of Excel are supported.
1.6Mb of free disk space (Approx)
Installation Instructions
Please remove any version of Password Control prior to version 2.1 before running the setup program.
Download and run the executable file to install Password Control. Follow the onscreen instructions. Password Control can be installed on a member server, domain controller or client PC. Password Control is not designed to work with computers that are not part of an Active Directory domain.
Password Control – Password Generation
Password Control allows you to generate random passwords at the click of a button (The “G” button). You can alter the format of the generated passwords by clicking the “Tools\Settings\Password Generation Options” menu to access the Password Generation Options dialog.
The default option is to generate a password constructed of random uppercase characters, lowercase characters and digits. The dialog box will look similar to the one below:
Password Generation Options - Standard
The options to include symbols, digits, lowercase & uppercase characters are available. A default password length of 0 is used – the minimum password length setting of the domain will override this value. You can increase the password length to a value higher than the domain minimum password length setting if required. A password similar to the ones below will be generated:
45kISo0
53iQj6E
Password Control also includes the option to use a mask or to use a “Pass Phrase”. The “Pass Phrase” option generates a password constructed of two random word separated by a space.
Password Generation Options - Pass Phrase
The “Pass Phrase” option is equivalent to using a password mask of “%w %w”. A password mask allows you to specify exactly how a password is constructed. You can use the following pre-defined placeholders:
%username% = The username of the selected user.
%u = A random uppercase character (A-Z)
%l = A random lowercase character (a-z)
%w = A random word
%s = A random symbol
%d = A random digit (0-9)
You can use any combination of placeholders to construct your password. Any other text will appear in the password as entered.
Examples
Mask Example 1 Example 2
%w %w finalised generalisation equalising glamorises
%w%d%d%d personalising788 randomised011
%username%%d%d%u david.wiseman06T david.wiseman68R
%u%l%l%l%d%d Qjff77 Tgbe49
%w%s unsynthesised\ parlour]
football%d%d%d football982 football943
football football football
Random Word Generation
Random words are generated from a file called “words.txt”. The file is a simple text file with a new word on each line – you can edit this list to suit your requirements. Although memorable, random words are less secure than a random combination of characters. For security reasons you might want to edit the text file – feel free to use your own word list. You can use words with mixed case characters for additional complexity. Also, consider using random words in combination with other placeholders in your password mask.
Password Control – Extending
Password Control can be extended by adding VBS script files in the “Scripts” folder of the Password Control application directory. These Scripts will appear in a “Tools” menu in the Password Control application.
Example 1 – Adding a “Delete User” option
In this example we will write a VBS Script to delete the selected user account in Password Control. Password Control will enumerate all the VBS files in the “Scripts” folder and display them as options in the tools menu. Password Control will pass the ADsPath of the current user to the script, allowing us to know which user is currently selected.
ADsPath = wscript.arguments.named.item("ADsPath")
' Validate that a user was selected
if ADsPath = "" then
msgbox "Please type the name of the user to delete in the Password Control username textbox",vbOkOnly+vbExclamation,"Username required"
wscript.quit
end if
' Bind to the user object
set objUser = getobject(ADsPath)
' Confirm that the user account is to be deleted
result = msgbox("Are you sure you want to delete this user account?" & vbcrlf & _
objUser.sAMAccountName,vbyesno+vbExclamation,"Confirm Delete")
if result = vbYes then
' Bind to the container object (organizational unit)
set objContainer = getobject(objUser.Parent)
' Delete the user account
objContainer.Delete "user","cn=" & objUser.cn
msgbox "User account deleted successfully",vbOkOnly+vbInformation
end if
Example 2 – Adding a shortcut to Active Directory Users and Computers
In this example we don’t need to verify if a valid user has been selected in Password Control.
Password Control – Connect As
Password Control includes a “Connect As” feature to make it easy for you to connect as a user with enhanced privileges. Your “everyday” user account might not have permissions to change user passwords, so you could connect as your “admin” user account. Select Connect As from the file menu.
Password Control - Connect As Dialog
The layout of this form should seem familiar. You need to specify a username, password & domain. You can enter the username as DOMAINNAME\USERNAME if you prefer. Click OK to validate the logon and connect under the security context of the specified user.
Click the “Connect As Self” menu item to revert back to the account you used to logon to Windows.
Note: Some features are disabled when you use the Connect As feature.
Password Control – Display Properties
The user display section featured above can be configured to show virtually any user account properties, including multi-valued properties. This guide will show you how easy it is to show additional properties.
Click File, Settings, Properties To Load
Check any attributes that you want to display
Other Attributes
If the attribute you want to display isn’t listed in any of the tabs, you can click the “Advanced” tab and add the attribute manually.
Adding an Attribute
Enter the LDAP Display Name of the property in the “Name” textbox. See section titled “Finding the correct name” below for more information.
Enter a friendly name for the property in the “Display Name” box – this can be anything you want. You might want to use “Tel” for “telephoneNumber”, “Surname” for “sn”.
Click the Add button to add the property
Deleting an Attribute
Select the property you want to remove in the list box.
Click the Remove button
Finding the correct name (LDAP Display Name)
Unfortunately the names used by Active Directory are not always very intuitive. e.g. “First Name” is actually defined as “givenName”. Last Name is defined as “sn”. Some attribute names are even more obscure – City is defined simply as “l” for locality.
If you have a property you want to add to the list but don’t know how the name is defined in the schema, there are a couple of ways to find this out.
Use the schema-snap in. (Easier to use ADSIEdit though)
Use the ADSIEdit utility
Using ADSIEdit
Install the Support Tools from the Windows Server CD
Find or create a test user account.
Edit a property on the user account to make the value distinctive. For example, you might want to enter the value “First Name” in the first name property – you will then look for the value “First Name” in ADSIEdit to find the name of the “First Name” property.
Open ADSIEdit – This utility looks similar to Active Directory Users & Computers.
Navigate ADSIEdit until you find the user object.
Right-click the user object & click properties.
Check the “Show only attributes that have values” checkbox – This will make your search easier.
Search for the attribute with the value that corresponds to what you entered in Active Directory Users and Computers.
Use the name in the “Attribute” column as the name for the “Properties To Load dialog box.
Password Control – Multiple Domains
Support for multiple domains has been improved in version 2 of Password Control. By default, the current domain is selected & a list of trusted domains are added to the menu and are available for selection. In a single domain environment, you can simply forget about this feature – Password Control will load up and be ready to set passwords for users in your domain.
To change the domain, click the File Menu, select Domain – A list of domains appear in the sub menu. Select the required domain. If the domain does not appear in the list, click the “Other” button and type the DNS name of the domain. You can also enter the IP Address of a specific domain controller. The domain entered will now be selected & will appear in the menu. The domain would need to be added again the next time you load password control.
You can also add a list of domains to appear in the menu that will be persisted the next time you load password control. Choose File, Settings, Domain List.
Password Control - Domain List Dialog
Enter the DNS name (Or IP Address of a domain controller) in the text box and click add to build your list of domains. Remove domains by clicking the “Remove” button. The “Dynamic” checkbox under the Remove button indicates that Password Control should add a list of Trusted domains to the menu. You can use this in combination with the domains entered manually.
You can also specify the default domain manually, or have it selected dynamically by Password Control. The second Dynamic checkbox tells password control to select the default domain automatically. To disable this feature, uncheck the “Dynamic” checkbox and specify the default domain manually using the combobox to the left.
NOTE: If Password Control appears to load slowly, you might get a performance boost by un checking both of the Dynamic checkboxes and specifying the domain list and default domain manually.
The Connect As feature might also be useful in a multi-domain environment.
Password Control – Advanced Configuration
Most settings are stored on a per user basis and are persisted in an xml file in the application data of a user profile. These settings can be modified within the password control application and there should be no need to manually edit the xml file. There is also an xml file stored within the Password Control application directory that gives access to some additional, application level settings. You can also edit this file to change the default user settings that are used.
Use nodepad or other xml/text editor to open the “PasswordControl.exe.config” file. I’d recommend making a backup copy of the “PasswordControl.exe.config” file before you start to make any changes.
Application settings are stored under an “” node under a root “” node.
Application settings are stored under the configuration\applicationSettings node. The following Application Settings are available:
Setting Syntax Default Value Explination
DisplayEnableAccount True/False True Controls the visibility of the “Enable Account” button.
DisplayDisableAccount True/False True Controls the visibility of the “Disable Account” button
DisplayForcePasswordChangeAtLogon True/False True Controls the visibility of the “Force Password Change At Logon”
DisplayAccountIsLockedOut True/False True Controls the visibility of the “Account is Locked” checkbox.
AutomaticAccountUnlock True/False True Accounts are automatically unlocked when the password is changed with this setting.
DisplayHelp True/False True Controls the visibility of the “Help” menu.
DisplayConnectAs True/False True Controls the visibility of the “Connect As” menu item under the “File” menu.
DisplayDomain True/False True Controls the visibility of the “Domain” menu item under the “File” menu.
DisplaySearch True/False True Controls the visibility of the “Search” menu item under the “File” menu. NB. Users can still access the Search dialog using the F3 shortcut.
DisplaySettings True/False True Controls the visibility of the “Settings” menu item under the “File” menu.
DisableSearch True/False False Disables the Search feature. Prevents access via the menu and the F3 shortcut.
DisplayGeneratePassword True/False True Controls the visibility of the “G” button for generating passwords.
DisplayTools True/False True Controls the visiblity of the “Tools” menu. Although visible by default, the menu will only appear if VBS scripts are present in the “Scripts” folder.
PasswordChar Single Character * Controls the password character used when typing passwords in the password box. You can change the password character used or remove the password character to display passwords in clear text as typed.
DisplayDomainPolicy True/False True Controls the visibility of the “Domain Policy” option in the help menu.
ConfirmSuccessfulPasswordChange True/False True Display a message box to indicate a sucessful password change.
AuditFailedEvents True/False False Write failed password & account operations to the event log.
AuditSuccessfulEvents True/False False Write password changes & account operations to the eventlog when they succeed.
DisplayBulkPasswordControl True/False True Controls the visibility og the “Bulk Password Control” menu option. (Keyboard shortcut still works)
DisableBulkPasswordControl True/False True Disables the “Bulk Password Control” dialog.
FindLDAPFilter String (|(DisplayName=?*)(cn=?*)(sAMAccountName=?*)(userPrincipalName=?*)(sn=?*)(mail=?*)) The LDAP filter used to find user accounts when the “Check Name” button is pressed.
If this option is changed the UserNameToolTipText setting should also be changed. The “?” placeholder will be replaced by the text entered in the username textbox.
UserNameToolTipText String Enter the username in one of the following formats:
* User logon name (Pre Windows 2000) e.g. FirstName.LastName
* User Principal Name e.g. FirstName@LastName@isimsoftware.com
If the username is valid, it should appear in underlined font when you press the TAB key to enter a password. Alternatively, click the “Check Name” button to search the following additional fields:
*DisplayName (displayName) *ObjectName (common-name,cn) *Surname (sn) *Email (mail) The tooltip to display relating to the username textbox.
FindUserLimit Integer 1000 The maximum number of user accounts to show when the “Check Name” feature is used and multiple results are returned.
PasswordControlScriptsPath String %apppath%\Scripts The directory to search for VBS Scripts to add to the tools menu in Password Control.
BulkPasswordControlScriptsPath String %apppath%\BulkScripts The directory to search for VBS Scripts to add to the tools menu in Bulk Password Control.
ConfirmBulkPasswordScripts Boolean True Display a confirmation when selecting a VBS file to run in the tools menu of the Bulk Password Control dialog.
DefaultPageSize Integer 500 The default page size used for Active Directory searches. Can be modified to improve performance if required.
UserFilter String (&(ObjectClass=User)(ObjectCategory=person)(!(showInAdvancedViewOnly=TRUE))(!(isCriticalSystemObject=TRUE))) The default filter applied when searching for user accounts. Objects that are shown in advanced view and critical system objects are not included in searches by default.
DisplayAccountMenu Boolean True Controls the visibility of the “Account Menu”.
DisplayUserMustChangePasswordAtNextLogon Boolean True Controls the visibility of the “User must change password at next logon” option in the account menu.
DisplayUserCannotChangePassword Boolean True Controls the visibility of the “Password never expires” option in the account menu
DisplayPasswordNeverExpires Boolean True Controls the visibility of the “Password never expires” option in the account menu.
DisplayStorePasswordUsingReversibleEncryption Boolean True Controls the visibility of the “Store password using reversible encryption” option in the account menu.
DisplayAccountIsDisabled Boolean True Controls the visibility of the “Account is disabled” option in the account menu.
DisplaySmartCardIsRequiredForInteractiveLogon Boolean True Controls the visibility of the “Smart card is required for interactive logon” option in the account menu.
DisplayAccountIsTrustedForDelegation Boolean True Controls the visibility of the “Account is trusted for delegation” option in the account menu.
DisplayAccountIsSensitiveAndCannotBeDelegated Boolean True Controls the visibility of the “Account is sensitive and cannot be delegated” option in the account menu.
DisplayUseDESEncryptionTypesForThisAccount Boolean True Controls the visibility of the “Use DES encryption types for this account” option in the account menu.
DisplayDoNotRequireKerberosPreAuthentication Boolean True Controls the visibility of the “Do not require kerberos pre authentication” option in the account menu.
Password Control – Delegating Permissions
Normal users are not given permissions by default to change other user’s passwords. Members of the Account Operators group are given this permission by default, but membership in this group will also give the user additional privileges. You will probably prefer to delegate only the permissions required to the users who require access to password control. The easiest way to delegate these permissions it to use the delegation of control wizard. I will walk you through the steps required to delegate the appropriate permissions.
** Please note that you should be fully aware of the consequences of using the delegation of control wizard before running this procedure on your production domain.
Load Active Directory Users and Computers
Navigate to the OU containing your organizations user accounts.
Right Click the OU – All Tasks – Delegate Control
Click Next.
Select the user accounts or groups that will use Password Control. I’ve created a security group called “Password Control” for the purpose of giving users access to the Password Control program.
Delegation Of Control Wizard - Users or Groups Step
Click Next.
Select “Create a custom task to delegate”
Delegation Of Control Wizard - Tasks to Delegate Step
Click Next.
Select “Only the following objects in the folder”
Check “User Objects”
Delegation Of Control Wizard - Active Directory Object Type Step
Click Next
Select the “General” & “Property-specific” check boxes.
Select “Reset Password”, “Write pwdlastset”, “Write userAccountControl” and “Write lockoutTime”
Delegation Of Control Wizard - Permissions Step
Click Next
Click Finish
Please note that there is no way to undo the actions performed by the delegation of control wizard. If you need to modify the security, you will need to enable the “advanced features” in Active Directory Users and Computers so that the Security tab becomes available.
Some of the permissions delegated might not be obvious:
pwdlastset – Required to force the password change at next logon
userAccountControl – Required to enable/disable user accounts.
Reset Password – Allows you to reset a users password.
lockouttime – Required to unlock user accounts. User accounts are automatically unlocked by password control when you change a user’s password.
Password Control – Hiding Accounts
Users of Password Control often ask if it’s possible to restrict which user accounts are visible to Password Control. For example, you might work for a school, college or university and only want helpdesk staff to use Password Control to change passwords for student accounts. You might also work for an organisation that has a number of “service” accounts that you do not want to be displayed in Password Control.
Note
By default Password Control only displays accounts where the “IsCriticalSystemObject” property not set to “TRUE” and the “showInAdvancedViewOnly” is not set to “TRUE”. The “Administrator” account is marked as a critical system object so this account won’t display in Password Control (New in version 2.2).
Security requirements vary dramatically from organisation to organisation. It’s worth noting at this point that any security options you are able to set in Password Control would only restrict the user when using Password Control to access Active Directory. It would be quite easy for a user to write a script or download another program from the internet that would allow them to circumvent any security options provided by Password Control.
I strongly recommend that you use Active Directory to secure your domain. The security policy set in Active Directory must be obeyed no matter what program is used to access the directory. You might want to read this section on security for more information.
If you want to “hide” user accounts from Password Control without modifying any security settings in your domain, create a security group called “PasswordControl_Invisible”. Make any user accounts you don’t want to appear in Password Control a member of this group (As a direct member or as a nested group member). Password Control will treat these accounts as if they didn’t exist.
Password Control – Network Install
This article explains how to configure password control to run from a network share.
Password Control was developed using the .NET Framework 2.0 and is therefore subject to the default security policy that applies full trust to code running on the local computer but not to code running on a network share. Running Password Control from a network share is relatively straightforward, but you will need to configure the security policy to allow Password Control to run.
Server Configuration
Install Password Control on the server.
Share the Password Control program folder.
Grant read permissions to the share. You will also need to ensure that Password Control users have appropriate NTFS permissions to the program folder.
Client Configuration
Check if the client computer has the “Microsoft .NET Framework 2.0 Configuration” in the “Administrative Tools”. If the tool does not appear in the Administrative Tools menu, please install the .NET Framework 2.0 SDK.
Open the “Microsoft .NET Framework 2.0 Configuration” tool. Navigate to “.NET Framework 2.0 Configuration\My Computer\Runtime Security Policy\”
At this point you can choose the policy level you want to use. This article will assume you want to modify the machine policy.
Expand “Machine\Code Groups\”. Right click the “All Code” node in the treeview and click “New” · Type a name for the code group and click next.
.NET Framework 2.0 Configuration - Create a new code group
You now need to choose how to identify the .NET application you want to trust. I’d recommend using either a URL or a strong name condition type.
URL:
Select “URL” from the condition drop down.
Enter the UNC Path to the Password Control application. E.g. \\servername\PasswordControl.
Note: You can use the “*” wildcard to trust all subfolders. E.g. \\servername\apps\*
Click “Next”
.NET Framework 2.0 Configuration - Create a new code group (condition type)
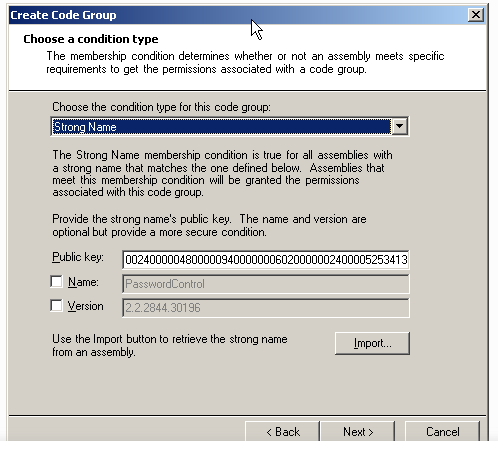
Strong Name: ·
Select “Strong Name” from the condition drop down.
Click the “Import” button.
Select the PasswordControl.exe file from the Password Control program folder on the network share. E.g. \\ServerName\PasswordControl\PasswordControl.exe. ·
Click “Next”.
You can now select a level of trust to assign. Choose the default “FullTrust” permission set and click “Next”.
Click “Finish”
Optional: Create a shortcut to the PasswordControl.exe file.
.NET Framework 2.0 Configuration - Create a new code group (Strong Name condition)
You have now completed the required steps to get Password Control working from the network share. Performing the above steps on multiple client computers would be a bit tedious. Luckily the .NET Framework Configuration Tool allows you to create an MSI installer package to deploy the security settings.
Click the “Runtime Security Policy” node.
Click the “Create Deployment Package” task.
.NET Framework 2.0 Configuration - Create MSI file
Select the policy level chosen in the previous steps (Machine Policy).
Select a folder to store the MSI file.
Click Finish.
.NET Framework 2.0 Configuration - Deploy Configuration in an MSI file
You can run the MSI manually on other client computers or use Active Directory to deploy the MSI file.
Password Control – FAQ
Can Password Control be run without admin privelages?
Normal users accounts do not have permissions to reset other users passwords. You must grant the appropriate permissions to allow users to use Password Control. You could create a Password Control Users group and delegate the appropriate permissions to that group. For more information on delegation, see the Password Control helpfile. If you prefer to use a built-in group, the Account Operators group grants all the permissions required to run Password Control. Please note that this group also grants other permissions not required by Password Control.If you are a network admin and have an “every day” account as well as an admin account, you can run Password Control under your everyday account and use the connect as feature to run Password Control under the context of your admin user account.
How do I check that my version of Password Control is up-to-date?
Open the about dialog (Help/About). The about dialog box will show the version of Password Control installed and will also show the latest version available on the website (from version 2.1).
What if I don’t want some user accounts to be visible to Password Control?
User accounts can be hidden from password control by creating a “PasswordControl_Invisible” security group in your domain. Make any users you don’t want to display in Password Control a member of this group. A nested membership test is performed so you can also add other groups to the “PasswordControl_Invisible” group.
What if I want to audit activities performed by Password Control?
You can have Password Control write successful and failed events to the eventlog by modifying the “AuditFailedEvents” and “AuditSuccessfulEvents” options in the configuration file. (“PasswordControl.exe.config”)
Can I hide certain features of Password Control?
DataImage22.png
DataImage22.png
DataImage27.png
DataImage27.png
DataImage27.png
DataImage27.png
DataImage27.png
DataImage27.png
DataImage4.png
DataImage4.png
DataImage4.png
DataImage4.png
DataImage4.png
DataImage4.png
DataImage4.png
DataImage4.png
DataImage40.png
DataImage40.png
DataImage46.png
DataImage46.png
DataImage46.png
DataImage46.png
DataImage46.png
DataImage46.png
DataImage57.png
DataImage57.png
DataImage57.png
DataImage57.png
DataImage57.png
DataImage57.png
DataImage62.png
DataImage62.png
DataImage7.png
DataImage7.png
DataImage90.png
DataImage90.png
DataImage90.png
DataImage90.png
DataImage90.png
DataImage90.png
DataImage90.png
DataImage90.png
DataImage90.png
DataImage90.png
DataImage90.png
DataImage90.png
DataImage90.png
DataImage90.png
isimSoftwarePasswordControl.rar
isimSoftwarePasswordControl.rar
isimSoftwarePasswordControl.zip
isimSoftwarePasswordControl.zip
| Files | ||
|---|---|---|
|
DataImage22.png 38,3 KB |
||
|
DataImage27.png 9,9 KB |
||
|
DataImage27.png 3,9 KB |
||
|
DataImage27.png 1,8 KB |
||
|
DataImage4.png 9,5 KB |
||
|
DataImage4.png 14,6 KB |
||
|
DataImage4.png 12,7 KB |
||
|
DataImage4.png 7,7 KB |
||
|
DataImage40.png 109,1 KB |
||
|
DataImage46.png 9 KB |
||
|
DataImage46.png 9,4 KB |
||
|
DataImage46.png 17,5 KB |
||
|
DataImage57.png 14 KB |
||
|
DataImage57.png 14,5 KB |
||
|
DataImage57.png 8,6 KB |
||
|
DataImage62.png 6,5 KB |
||
|
DataImage7.png 64,7 KB |
||
|
DataImage90.png 8,3 KB |
||
|
DataImage90.png 22,7 KB |
||
|
DataImage90.png 18,8 KB |
||
|
DataImage90.png 18,5 KB |
||
|
DataImage90.png 4 KB |
||
|
DataImage90.png 16,6 KB |
||
|
DataImage90.png 21,8 KB |
||
|
isimSoftwarePasswordControl.rar 693,5 KB |
||
|
isimSoftwarePasswordControl.zip 795,7 KB |
 Get help for this page
 Isimsoftware Support System